If you've ever pulled a homemade pizza out of your oven and thought "why doesn't this look like pizzeria pizza?" - you're not alone, and the answer probably isn't your dough. It's your baking surface.
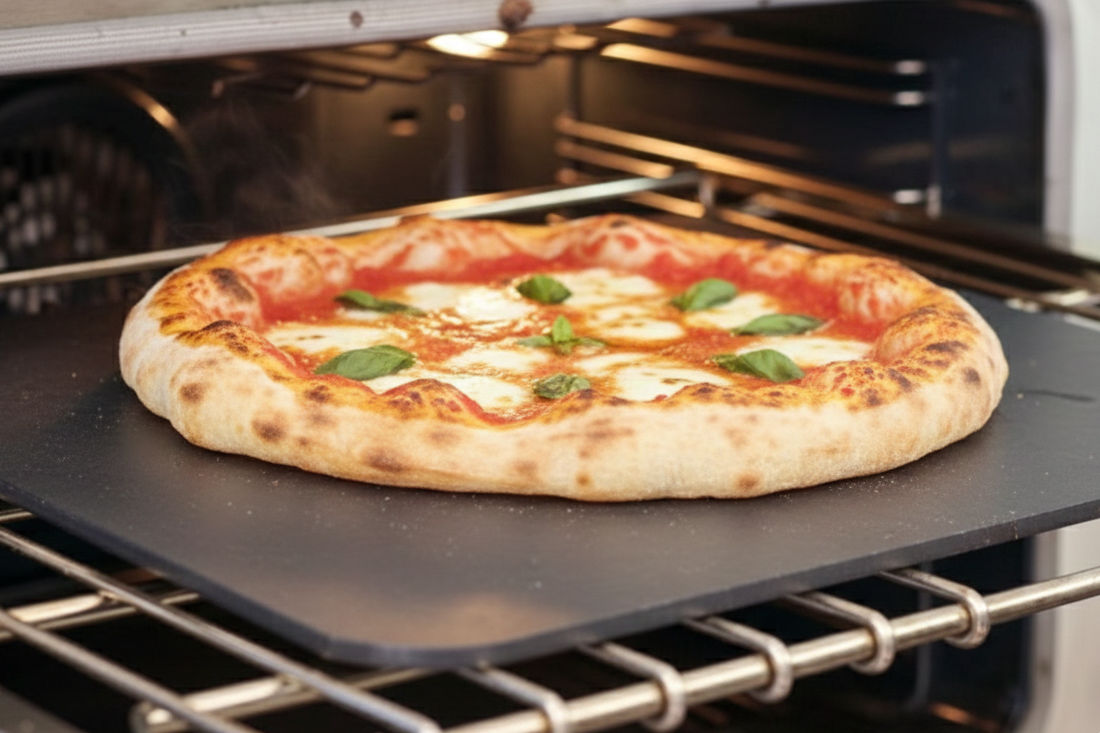
A pizza steel (sometimes called a baking steel) is one of those rare kitchen upgrades where you genuinely notice the difference on the very first use. We're talking blistered, leopard-spotted crusts with a crispy bottom and serious oven spring - the kind of results that make people ask if you got a pizza oven.
You didn't. You just got smarter about physics.
Let's break down everything you need to know: what a pizza steel actually is, what it's made of, how thick it should be, and how to use, season, and maintain one so it lasts basically forever.
What Is a Pizza Steel?
A pizza steel is a flat slab of steel - usually somewhere between 1/4" and 1/2" thick - that sits in your oven and acts as your pizza's baking surface. Think of it as a pizza stone's stronger, faster, more durable older sibling.
The concept was popularized around 2012 after Nathan Myhrvold's Modernist Cuisine pointed out something that metalworkers already knew: steel conducts heat dramatically better than ceramic. Andris Lagsdin, who worked at his family's steel shop in Massachusetts, read that insight and realized he was literally surrounded by the solution. He started experimenting with steel plates and eventually founded the Baking Steel company, kicking off a movement that's completely changed home pizza making.
So why does the material matter so much? It comes down to thermal conductivity - how fast a surface can transfer its stored heat into your dough. Steel conducts heat roughly 18 to 20 times faster than a ceramic or cordierite pizza stone. That's not a marginal improvement. That's a completely different baking experience.
Here's an analogy: imagine walking barefoot across a concrete patio on a hot summer day. Warm, right? Uncomfortable, maybe. Now imagine that same patio is made of steel. Same sun, same air temperature - but you'd burn your feet in seconds. (If you're old enough to remember the steel slide at the playground in the middle of summer, you already know exactly what I'm talking about.) That's the difference in how these materials move heat, and it's exactly what happens to pizza dough when it hits a preheated steel.
The result? Your crust starts cooking immediately. You get a faster, taller oven spring (that puffy rim), better browning on the bottom, and a shorter overall bake time - often 4 to 6 minutes instead of 8 to 10 on a stone. If you've been using the PizzaLogic dough calculator to dial in your hydration and yeast levels, a pizza steel is the missing piece that lets your dough actually perform the way it's supposed to.
What Is a Pizza Steel Made Of?
Most pizza steels on the market are made of A36 carbon steel, which is a standard structural steel. It's the same stuff used in buildings and bridges - affordable, widely available, and extremely conductive compared to alternatives.
One thing worth knowing: not all steel is created equal for pizza. You'll occasionally see stainless steel options, but stainless is actually a poor choice here. Common stainless alloys like 304 have significantly lower thermal conductivity than carbon steel, which means slower heat transfer and less crispy results. Carbon steel (A36 specifically) is what you want.
A36 steel is composed almost entirely of iron with small amounts of carbon and manganese. It's food-safe when properly seasoned and has been used in cookware (cast iron skillets, carbon steel pans, woks) for centuries. If you've ever cooked on cast iron, you already understand the basic care routine.
How Thick Should a Pizza Steel Be?
This is where it gets interesting, because thickness affects both performance and practicality. Most steels you'll find range from 3/16" to 1/2", and each has trade-offs.
1/4" (6mm): This is the most popular thickness and a great starting point for most home pizza makers. It's heavy enough to hold serious heat, light enough that it won't destroy your oven racks, and preheats in about 45 to 60 minutes. The trade-off is that a 1/4" steel loses heat faster after you launch a pizza onto it - you'll want to wait 7 to 10 minutes between pies for it to recover.
3/8" (9.5mm): If you make pizza regularly or host pizza nights, this is arguably the real sweet spot. Testing has shown that 3/8" steel holds surface temperatures above 700°F for over 90 seconds after loading cold dough, compared to 1/4" steel which drops more than 100°F within 30 seconds. It recovers faster between pizzas, meaning less waiting when you're feeding a crowd. The downside? It's heavier and takes a bit longer to preheat.
1/2" (12mm): The heavyweight champion. These hold a massive amount of thermal energy and are ideal for back-to-back pizza sessions. But they can weigh 30 pounds or more, take well over an hour to fully preheat, and are genuinely difficult to move. Unless you're running a serious home pizza operation, this is probably overkill.
For most people making one to three pizzas at a time, 1/4" to 3/8" is the range to shop in. If your oven has sturdy racks and you don't mind the weight, lean toward 3/8".
How to Use a Pizza Steel
Getting great results from a pizza steel isn't complicated, but there are a few things you need to do differently than you would with a stone.
Placement
Position your steel on the upper third of your oven, about 4 to 6 inches below the broiler element. This is important - you want radiant heat from above to cook the toppings while the steel handles the crust from below. Placing it too low means your toppings won't keep pace with the bottom.
The Preheat
How long to preheat a pizza steel depends on your thickness and oven, but the general rule is: crank your oven to its highest setting (usually 500°F to 550°F) and let the steel soak for at least 45 to 60 minutes. Don't rush this. The steel needs time to absorb and equalize all that energy. An infrared thermometer is a great investment here - you're looking for a surface temp of at least 500°F before launching.
The Broiler Trick
This is the move that separates okay home pizza from great home pizza. About 5 to 10 minutes before you're ready to launch, switch your oven from Bake to Broil. The broiler supercharges the top surface of the steel with infrared heat, giving you more energy to transfer into the crust. It also provides intense top-down heat that blisters the cheese and crust beautifully.
The Launch
Use a pizza peel dusted with semolina flour (preferred over regular flour - it rolls like little ball bearings and doesn't burn as easily). Give your peel a test shimmy before you commit to make sure the dough isn't stuck. Then slide the pizza onto the steel with a quick, confident motion.
Once the pizza's on the steel, you can either switch back to Bake for a more moderate 5 to 6 minute cook, or keep the broiler on for a fast, aggressive 3 to 4 minute Neapolitan-style bake. Watch it closely if you go the broiler route - the difference between perfectly charred and burnt is about 30 seconds.
Pro tip: If you own a second pizza steel (or even a heavy baking sheet), place it on a rack above your pizza to act as a radiant heat source. This mimics the low ceiling of a professional pizza oven and helps cook the toppings faster. Some serious home pizzaiolos swear by this two-steel setup.
Can You Use a Pizza Steel on the Grill?
Yes - and honestly, a pizza steel on the grill might be where it really shines. Because steel won't crack from thermal shock the way ceramic does, it can handle the intense, direct flames of a gas or charcoal grill without any issues.
That said, the biggest mistake people make with a pizza steel on the grill is keeping the burners on full blast while they cook. A grill delivers much more direct bottom heat than an oven, so your steel gets ripping hot - fast. If you leave all burners cranked, you'll burn the bottom of your pizza before the top is done.
Here's what works:
- Preheat the steel with all burners on high and the lid closed for about 20 to 30 minutes.
- When you're ready to cook, turn off the burner directly beneath the steel (or move coals to one side on a charcoal grill). You're creating indirect heat - the steel has already absorbed plenty of energy.
- Launch the pizza, close the lid immediately, and let it cook for 5 to 8 minutes depending on your setup. The closed lid traps heat and mimics an oven environment.
- Keep lid-opening to a minimum. Every time you peek, you lose the dome heat you need for the toppings.
One more note: if you use your steel on the grill, bring it inside when you're done. Leaving it outside to cool down and then getting caught in the rain is a very common way to end up with a rusty steel. Ask anyone who's done it once - they never do it again.
How to Season a Pizza Steel
If you've ever seasoned a cast iron skillet, this process will feel familiar. Seasoning a pizza steel creates a polymerized layer of oil on the surface that prevents rust and builds up a natural nonstick coating over time.
Many steels arrive pre-seasoned, but you'll want to re-season periodically - especially if the surface starts looking dull and gray, food begins sticking, or you've had to scrub off rust.
Step-by-step:
-
Wash the steel with warm water and a stiff brush (soap is fine for initial seasoning or re-seasoning - you're about to build a new coating anyway). Dry it immediately and completely. Don't let it air dry.
-
Apply a very thin layer of high-smoke-point oil. Flaxseed oil and grapeseed oil are the most popular choices. The key word here is thin - apply the oil, then wipe it off with a clean paper towel until it looks like there's nothing left. You want a micro-thin layer, not a visible coating. Thick coats result in a sticky, tacky surface instead of a hard, smooth one.
-
Bake the steel at 400°F for one hour. Place it in a cold oven, heat to 400°F, then start your timer once it's at temp. Turn the oven off after an hour and let the steel cool completely inside - don't open the door.
-
Repeat for 2 to 3 coats. Each coat builds on the last. You'll notice the steel darkening from gray to a warm brown or bronze color. That's the polymerized oil doing its job.
That's it. The whole process takes a few hours (mostly passive oven time), and you only need to do it two to four times per year depending on how often you bake.
How to Clean a Pizza Steel
Day-to-day cleaning is straightforward:
- Let the steel cool in the oven after baking (it retains heat for a long time - be careful).
- Scrape off any burnt flour, cheese, or toppings with a bench scraper or stiff spatula while the steel is still warm but not scorching.
- Wipe it down with a dry cloth or paper towel. For stubborn spots, a little hot water and a stiff brush works fine.
- Dry it immediately. This is the most important step. Carbon steel and moisture are not friends. Even a few hours of sitting wet can start rust spots.
- Avoid soap for routine cleaning - it can strip the seasoning layer. Save soap for when you're doing a full re-season.
How to Remove Rust from a Pizza Steel
Rust happens. Maybe you forgot to dry it after cleaning, or you left it on the grill overnight and it rained. It looks alarming but it's not a death sentence - not even close.
- Scrub the rust with steel wool, a Scotch-Brite pad, or fine-grit sandpaper (150 grit works well). You just need to get back down to clean metal.
- Wash and dry the steel thoroughly.
- Re-season immediately using the process above. Two to three coats should have it back to normal.
Your steel will look different after a rust removal and re-season - the patina won't match what you had before - but it'll perform just as well. The seasoning builds back up over time with regular use.
Storing Your Pizza Steel
Most people just leave the steel in their oven permanently on a middle or lower rack. It adds thermal mass to your oven (which actually improves overall baking performance for everything, not just pizza), and it means you never have to wrestle a 15-plus-pound slab of steel in and out of a cabinet.
If you do store it elsewhere, keep it somewhere dry. A humid basement or garage is a recipe for rust. The drawer under your oven, a dry pantry shelf, or even standing it upright in a corner all work fine. Just make sure whatever surface it's sitting on can handle the weight.
The Budget Option: Making a DIY Pizza Steel
If the $100 to $150 price tag on branded steels gives you pause, here's a secret: you can get an A36 steel plate cut to size at a local metal fabricator or steel shop for $25 to $50 depending on your area. Search for "metal fabrication" or "steel supply" near you and ask for a food-safe A36 plate, 1/4" thick, cut to fit your oven.
You'll need to do a little extra prep work - sanding down any sharp edges, soaking the plate in a 50/50 vinegar-and-water solution for 24 to 48 hours to remove the mill scale (a bluish-black oxide layer from manufacturing), and then seasoning it yourself. It's a weekend project, but the end result performs identically to a $150 branded steel.
Fair warning: branded steels from companies like Baking Steel or Nerd Chef come pre-seasoned, with rounded edges and better finishes. If you'd rather skip the DIY hassle and get something ready to use out of the box, that's totally reasonable too. Either way, you're getting the same fundamental physics.
Pizza Steel vs Pizza Stone: Quick Comparison
| Pizza Steel | Pizza Stone | |
|---|---|---|
| Material | A36 carbon steel | Ceramic or cordierite |
| Heat transfer speed | ~18-20x faster | Baseline |
| Heat recovery | Fast (good for multiple pizzas) | Slow (needs time between pies) |
| Durability | Virtually indestructible | Prone to cracking from thermal shock |
| Maintenance | Needs seasoning, rust prevention | Minimal (absorbs stains over time) |
| Weight | Heavy (15-30+ lbs) | Moderate (5-15 lbs) |
| Price | $80-$150+ | $20-$50 |
| Best for | NY-style, thin crust, Neapolitan | Artisan bread, focaccia, calzones |
| Grill-safe? | Yes | Risky (can crack from direct flame) |
Neither is "wrong" - a stone is perfectly fine for occasional baking and bread-making. But if you're serious about pizza and you want the best crust your home oven can produce, steel is the clear upgrade.
Other Things You Can Do with a Pizza Steel
A pizza steel isn't a one-trick pony. Because it's essentially a giant, heavy-duty flat cooking surface, you can also use it for:
- Baking bread (amazing for sourdough - the bottom crust gets incredible)
- Searing steaks (heat it on the stovetop and use it like a plancha)
- Making smash burgers (same stovetop method)
- Baking cookies and pastries (the even heat distribution produces very consistent results)
- Reheating leftover pizza (low oven, steel, 5 minutes - way better than the microwave)
Dial In Your Dough First
A pizza steel will absolutely transform your crust - but it works best when your dough is dialed in to begin with. If you're still working on your dough game, the beginner's guide to homemade pizza is a great starting point. If you haven't already, try running your recipe through the PizzaLogic pizza dough calculator to nail your flour, water, yeast, and salt ratios before your next bake. Pairing a steel with a cold ferment is how you close the gap between home pizza and pizzeria pizza.
Sources and further reading:
- Baking Steel - The Science Behind the Baking Steel - Andris Lagsdin's breakdown of thermal conductivity
- PizzaBlab - Pizza Baking Surfaces Guide - In-depth thermal property comparisons with bake tests
- Sip and Feast - Pizza Steel 101 (DIY Guide) - Step-by-step instructions for making your own steel from A36 plate
- Baking Steel - How to Clean and Re-Season - Official care instructions from the Baking Steel company
- AmazingRibs - The Science of Pizza on the Grill - Meathead's deep dive into grilling pizza with steels and stones