If you've ever pulled a homemade pizza out of your oven and ended up with a pale, floppy crust that can't hold its own weight - you're not alone, and the problem probably isn't your dough. It's your baking surface.
A pizza stone is one of the most accessible upgrades you can make to your home pizza setup, and the difference is obvious from the very first bake. I'm talking crisper bottoms, better oven spring, and a crust that actually holds its shape when you pick up a slice instead of flopping over like a sad little taco.
Here's everything you need to know: what a pizza stone actually is, what it's made of, how thick it should be, and how to use and maintain one so it lasts for years.
Full transparency: if you're starting from scratch and budget isn't a concern, a pizza steel is probably the better tool. Steel transfers heat dramatically faster than stone, produces crispier crusts, and can't crack. But steels are newer, less common, and roughly two to three times the price. Pizza stones have been around for decades, they're available practically everywhere, and a lot of people already have one sitting in a cabinet. If that's you - or if you're just getting started and want an affordable first upgrade - a stone is still a massive improvement over a bare oven rack, and it's worth knowing how to get the most out of one.
What Is a Pizza Stone?
A pizza stone is a flat, heavy slab - usually ceramic or cordierite - that sits inside your oven and acts as your pizza's baking surface. You preheat it for a long time so it absorbs a massive amount of heat energy, and then when you slide your dough onto it, that stored heat transfers directly into the crust. It's essentially a way to mimic the brick floor of a traditional wood-fired pizza oven without, you know, building a brick oven in your kitchen.
If you've ever walked barefoot across a sunbaked brick patio on a hot summer day, you already understand the principle. The bricks absorbed heat all day, and now they're radiating it back into your feet. A pizza stone does the same thing to your dough - but on purpose and with better results.
What Is a Pizza Stone Made Of?
Most pizza stones you'll find today are made of one of two materials: ceramic (including standard clay) or cordierite.
Cordierite is a naturally occurring mineral that handles extreme temperatures and thermal shock exceptionally well. It's generally considered the gold standard for home pizza stones because it's significantly less likely to crack than standard ceramic when subjected to rapid temperature changes - like when cold dough hits a 500°F surface. If you're shopping for a stone and you see "cordierite" on the listing, that's the one you want.
Plain ceramic and clay stones work fine and tend to be cheaper, but they're more fragile. They're the ones you see horror stories about cracking in half after a few months. That said, if you treat a ceramic stone carefully (always preheat it gradually, never shock it with cold water), it can last a long time too. It's just less forgiving of mistakes.
Both materials are porous, which matters for how the stone actually bakes your pizza. More on that in a second.
What Does a Pizza Stone Do?
This is the part where a little bit of physics goes a long way.
A pizza stone does two things simultaneously. First, it stores thermal mass - a large reservoir of heat energy that it releases into your dough on contact. When cold dough hits that hot surface, the crust starts cooking immediately from the bottom up, which is what gives you a fast, tall oven spring (that puffy, airy rim) and good browning underneath.
Second - and this is the part most people don't think about - the porous surface of the stone actually wicks moisture away from the bottom of the dough as it bakes. Pizza dough is wet. If that moisture has nowhere to go (like when you bake on a flat metal sheet pan), it steams the bottom of the crust instead of crisping it. A stone pulls that moisture into its pores, which is the difference between a crispy bottom and a soggy one.
This is the same reason a professional pizza oven with a brick or stone floor produces a different crust than your home oven with a metal rack. The floor isn't just hot - it's absorbing moisture. Your pizza stone recreates that effect.
How Thick Should a Pizza Stone Be?
Thickness affects both performance and practicality. Most stones you'll find range from 1/2" to 1" thick, and each comes with trade-offs.
1/2" (13mm): This is the most common entry-level thickness and a perfectly fine place to start. It preheats relatively quickly (about 45 minutes at your oven's max temperature) and is easy enough to move around. The trade-off is thermal recovery - a 1/2" stone loses heat fast when cold dough lands on it, so if you're baking multiple pizzas back to back, you'll need to wait 10 to 15 minutes between pies for the stone to get back up to temperature. For one or two pizzas at a time, it's totally adequate.
3/4" to 1" (19 to 25mm): This is the sweet spot if you bake pizza regularly or host pizza nights. Thicker stones hold significantly more thermal energy, which means they recover faster between pizzas and deliver more consistent results across a multi-pie session. The downside is weight and preheat time - a 1" stone can easily need a full hour at max temp before it's ready, and some of the larger ones get heavy enough that you'll want to just leave them in the oven permanently (which is actually a good idea anyway - more on that later).
For most people making one to three pizzas at a time, either thickness works. If you're regularly doing four or more pies in a session, lean toward the thicker end.
How to Use a Pizza Stone
Getting great results from a pizza stone isn't complicated, but there are a few steps you want to get right. The most common mistakes are all about impatience.
Placement
Position your stone on the upper-middle rack of your oven - roughly 4 to 6 inches below the broiler element if your oven has one at the top. You want the stone close enough to the top that ambient heat and radiant energy from above help cook the toppings, but low enough that the bottom crust has time to crisp before the cheese starts burning. If you find your toppings are done but the bottom is still pale, move the stone down a notch. If the bottom burns before the cheese melts, move it up.
The Preheat
This is the most critical step, and it's where most people go wrong. Your oven's preheat beep is a lie - at least for pizza purposes. That beep means the air in the oven has reached the target temperature, but the stone itself is still absorbing heat and is nowhere near ready.
Place your cold stone in a cold oven, set the temperature as high as it will go (usually 500°F to 550°F), and then wait at least 45 to 60 minutes after the oven says it's preheated. The stone needs time to soak up and equalize all that energy throughout its mass. An infrared thermometer is a great investment here - you're looking for a surface temp of at least 475°F to 500°F before you launch.
I cannot overstate this: a 15-minute preheat on a stone will give you mediocre results and you'll wonder what all the fuss was about. A 60-minute preheat on the same stone will make you feel like you unlocked a cheat code. The stone didn't change. The heat did.
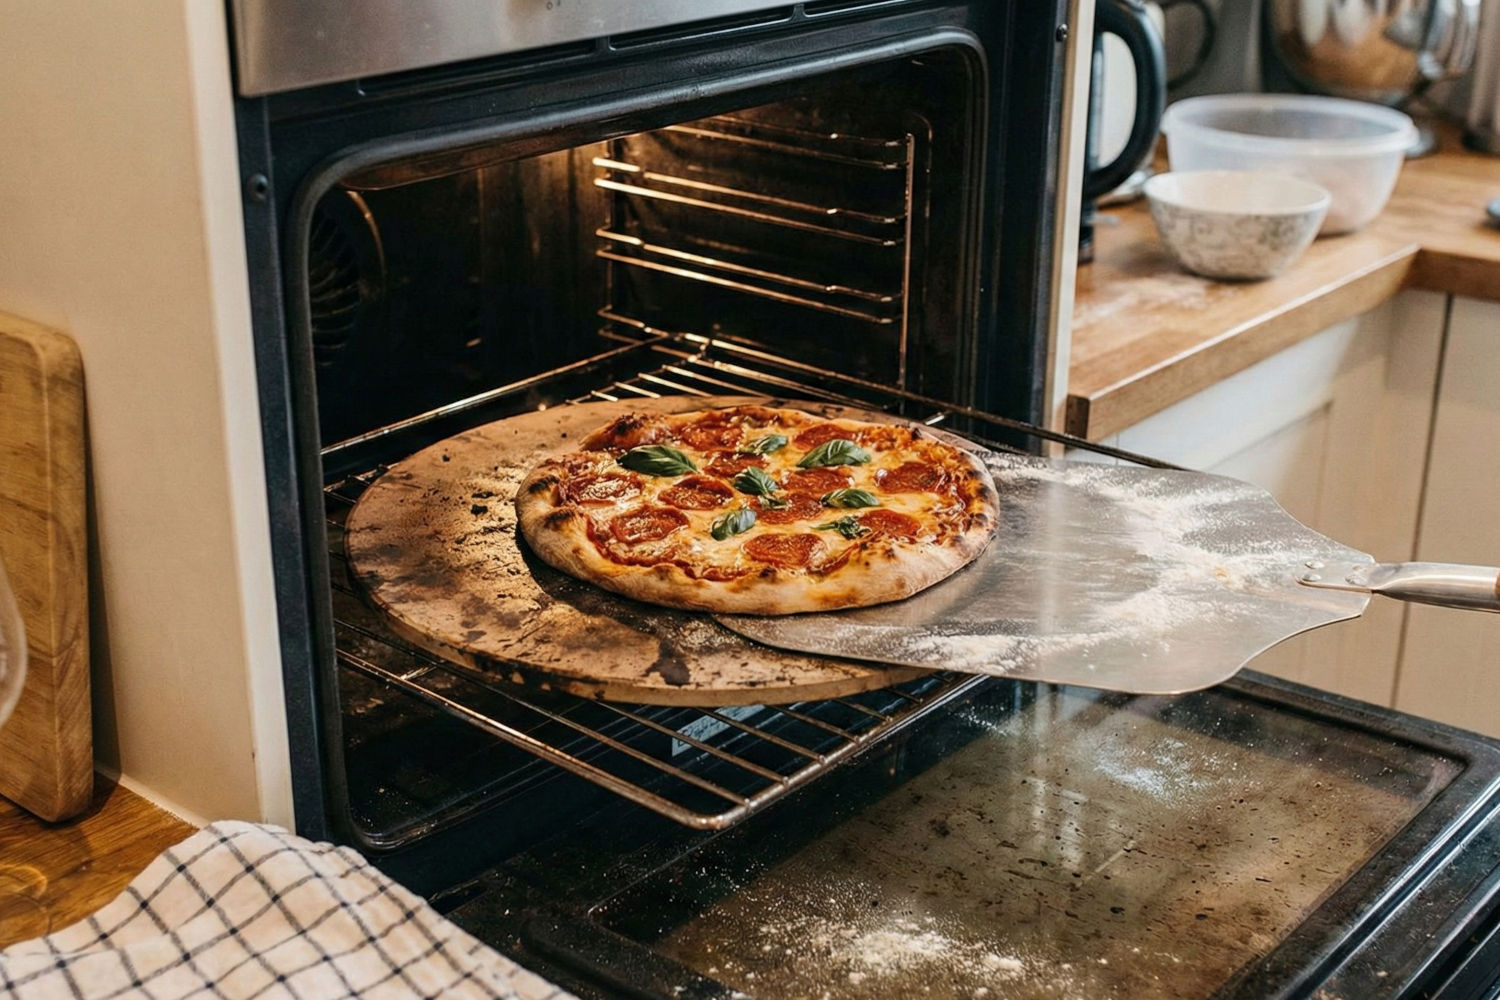
The Launch
This is the part that intimidates people, but it's really just a matter of confidence and a little semolina.
Use a pizza peel - wood or metal - dusted with semolina flour. Semolina acts like tiny ball bearings under the dough and doesn't burn as easily as regular flour. Build your pizza on the peel (or transfer a stretched dough round onto it), then give it a quick shimmy to make sure the dough isn't stuck anywhere. If it slides freely, you're good.
Open the oven, place the tip of the peel near the back edge of the stone, and pull the peel back toward you with a quick, confident motion. The pizza should slide right off onto the stone. Don't be tentative here - a slow, hesitant launch is how you end up with a folded-over mess. Think of it like pulling a tablecloth out from under dishes. Commit.
Let it bake for 7 to 12 minutes depending on your oven's max temperature, the thickness of your dough, and how loaded your toppings are. Keep an eye on it after the 6-minute mark. You're looking for a golden-brown bottom (lift an edge with a spatula or the peel to check) and bubbling cheese with some browning on top.
How to Cook Frozen Pizza on a Pizza Stone
Can you improve a store-bought frozen pizza with a stone? Absolutely. But there's one important thing to watch out for: thermal shock.
A frozen pizza is extremely cold and contains a lot of ice crystals. If you throw it directly onto a ripping hot 500°F stone, the sudden temperature difference can crack the stone in half - especially if it's ceramic rather than cordierite. I've seen it happen, and it's a sad day.
Here's how to do it safely. Preheat the stone to the temperature specified on the pizza box (usually 375°F to 425°F - not your usual max setting). While the oven preheats, pull the frozen pizza out of the freezer and let it sit on the counter for 10 to 15 minutes so it's not completely rigid. Then slide it onto the stone and bake according to the box directions, checking a couple minutes early since the stone tends to speed things up.
The difference is noticeable. Even a cheap frozen pizza comes out with a crispier, more structured crust on a stone compared to baking it directly on a metal rack or sheet. It won't turn a $5 freezer pizza into artisan pizza, but it's a genuine improvement.
How to Cook Pizza on the Grill with a Stone
Taking pizza outside in the summer is great, but grilling with a stone requires a different heat management approach than the oven. A grill delivers much more intense, direct bottom heat than an oven does, so you need to be careful about burning the crust before the toppings are done.
Here's the approach that works:
Place the stone on the unlit grill grate, then turn all burners to high and close the lid. Let it preheat for 30 to 45 minutes. Right before you're ready to launch your pizza, turn the burner directly under the stone down to low or off, leaving the surrounding burners on high. You're creating indirect heat - the stone has already absorbed plenty of energy, and the surrounding burners plus the closed lid will provide the dome heat you need for the toppings.
Launch the pizza onto the stone, close the lid immediately, and resist the urge to peek for at least 4 to 5 minutes. Every time you open the lid, you dump all the dome heat you need for the cheese and toppings. Check it around the 5-minute mark, and then again every minute or two until it's done.
If you're doing this on a charcoal grill, the same indirect principle applies - bank your coals to one side and place the stone on the other. The stone radiates the heat it's already stored, and the coals provide ambient dome heat.
One important note: if you're using a ceramic or clay stone (not cordierite), be extra cautious with direct flame on a grill. The thermal shock risk is higher here than in an oven because of the intense, concentrated heat from the burners. Cordierite handles grills much better. If you're planning to grill with a stone regularly, a pizza steel is arguably the better tool for the job since steel can't crack at all.
For a deeper dive on grilling pizza (including steel setups and charcoal methods), check out the full guide: How to Cook Pizza on the Grill.
How to Clean a Pizza Stone
Cleaning a pizza stone is easy precisely because you should do as little as possible.
Let the stone cool completely in the oven after baking. Never shock a hot stone with cold water - this is one of the fastest ways to crack it. Once it's cool, scrape off any baked-on cheese or dough with a bench scraper, stiff spatula, or a dedicated grill brush. Wipe it down with a damp cloth if needed.
Never use soap. Pizza stones are porous. They absorb liquids. If you wash your stone with dish soap, the stone will absorb that soap, and your next pizza will taste like it. Same goes for soaking it in water - just don't. A stone should never be submerged.
Over time, your stone will get dark and stained. That's completely normal and not something to worry about. It's a natural patina from the oils and flour that have baked into the surface, and it's a sign of a well-used stone, not a dirty one. Some people actually think the seasoned patina improves performance slightly, similar to how a well-seasoned cast iron pan develops character over time.
Pizza Stone vs Pizza Steel: Quick Comparison
| Pizza Stone | Pizza Steel | |
|---|---|---|
| Material | Cordierite or ceramic | A36 carbon steel |
| Heat transfer speed | Baseline | ~18 to 20x faster |
| Heat recovery | Slow (needs time between pies) | Fast (good for multiple pizzas) |
| Durability | Can crack from drops or thermal shock | Virtually indestructible |
| Maintenance | Minimal - scrape and wipe (no soap) | Needs seasoning to prevent rust |
| Weight | Moderate (5 to 15 lbs) | Heavy (15 to 30+ lbs) |
| Price | $25 to $60 | $80 to $150+ |
| Best for | Bread, focaccia, calzones, casual baking | NY-style, thin crust, Neapolitan |
| Grill-safe? | Risky (can crack from direct flame) | Yes - no cracking risk |
Neither is a bad choice. A stone is a perfectly good entry point for home pizza - affordable, low-maintenance, and capable of producing crusts that are dramatically better than baking on a sheet pan. But if you're serious about chasing pizzeria-quality results and you bake frequently, a pizza steel is the clear step up. The heat transfer difference is not subtle.
Other Things You Can Do with a Pizza Stone
A pizza stone isn't a one-trick tool. Because it provides such a stable, even heat source, it's useful well beyond pizza. You can use it for:
- Baking bread - especially rustic loaves and sourdough. The hot stone gives you a great bottom crust and better oven spring.
- Crisping up leftover pizza - low oven (350°F to 375°F), stone, 5 to 8 minutes. Infinitely better than the microwave. (More on that: How to Reheat Pizza.)
- Roasting vegetables - place a sheet pan directly on the hot stone for more even, intense bottom heat.
- Baking flatbreads, naan, and pita - the hot stone mimics the floor of a tandoor or hearth and gives you those characteristic charred spots.
- General oven temperature stability - I leave mine in the oven permanently on a lower rack. The thermal mass helps regulate temperature swings when you open and close the oven door, which improves baking results for everything, not just pizza.
Dial In Your Dough First
A hot stone will absolutely transform your crust - but it performs best when your dough is dialed in to begin with. If you're still figuring out your dough game, the beginner's guide to homemade pizza covers the fundamentals. And if you haven't already, run your recipe through the PizzaLogic pizza dough calculator to nail your flour, water, yeast, and salt ratios before your next bake.
If you want to take things further, pairing a properly preheated stone with a cold-fermented dough and the right hydration level is how you start closing the gap between home pizza and pizzeria pizza - no $500 oven required.
Sources and further reading:
- PizzaBlab - Pizza Baking Surfaces Guide - In-depth thermal property comparisons and bake tests for stones, steels, and other surfaces
- Serious Eats - The Best Pizza Stones and Steels - Tested reviews and performance breakdowns
- AmazingRibs - The Science of Pizza on the Grill - Meathead's deep dive into grilling pizza with stones and steels