Your oven can make a good pizza. Your grill can make a great one.
If you've never thrown a pizza on the grill before, you're missing out on one of the best-kept secrets in home pizza making. A grill reaches temperatures most home ovens can only dream of, and that intense heat can translate directly into a crispier crust, beautifully charred edges, and a subtle smokiness that takes your homemade pizza to another level.
Whether you're working with fresh dough on a gas grill, tossing a frozen pizza over charcoal, or experimenting with your pellet smoker - this guide covers it all. Let's fire it up.
Why Grill Pizza in the First Place?
Before we get into the how, let's talk about the why. Most home ovens max out around 500-550°F. A good pizza wants more heat than that. Wood-fired pizza ovens run at 700-900°F, and while your backyard grill won't get quite that hot, it can easily hit 550-600°F - and that's a meaningful upgrade over your kitchen oven.
That extra heat does a few important things. It cooks the crust faster, which means less moisture escapes from the dough - you get a crispier outside and a more tender, airy inside. It also gives you those gorgeous charred spots on the bottom of the crust, the kind you see at really good pizzerias. And if you're using charcoal or wood pellets, there's a natural smokiness that you simply can't replicate indoors.
Plus, there's the practical benefit: you're not heating up your kitchen in the middle of summer. Pizza night becomes an outdoor thing, and that's honestly half the fun.
How Do You Cook a Pizza on a Gas Grill?
Gas grills are the most straightforward setup for grilled pizza, and they give you great temperature control - which matters when you're working with raw dough and a very short cook time.
The Two-Zone Setup
This is the single most important concept for grilling pizza, so don't skip it. You need two heat zones on your grill: a hot (direct heat) zone and a cooler (indirect heat) zone.
On a three-burner gas grill, this is easy - crank the outer burners to high and leave the middle one off. On a two-burner grill, set one side to high and the other to low or off.
Why does this matter? You'll use the direct heat side to sear the dough and get those charred grill marks. Then you'll move the pizza to the indirect side to finish cooking the toppings and melt the cheese without burning the bottom. It's a similar concept to reverse searing a steak - you're using different heat levels for different stages of the cook.
Step-by-Step: Fresh Dough on a Gas Grill
Preheat the grill. Get all burners cranked to high with the lid closed. You want to hit at least 500°F - ideally closer to 550-600°F. This takes 15-20 minutes depending on your grill.
Prep your dough. While the grill preheats, stretch or roll your dough into a thin round (or oval - nobody's judging). About 10-12 inches across and relatively thin works best. If the dough keeps snapping back, cover it with a towel, let it rest for five minutes, and try again. Cold dough is stubborn, so always let it come to room temperature for at least an hour before stretching.
This is a great time to use the PizzaLogic dough calculator to dial in the right hydration and flour amounts for a dough that stretches easily and holds up on the grill.
Brush with olive oil. Give one side of the dough a light coating of olive oil. This is the side that goes down on the grates first. The oil prevents sticking and promotes a nice, golden sear.
Get your toppings ready. This is critical. Grilling pizza moves fast - once that dough hits the grates, you've got minutes, not leisure time. Have your sauce, cheese, and toppings all prepped and within arm's reach before you start. Think of it like a mise en place for the grill.
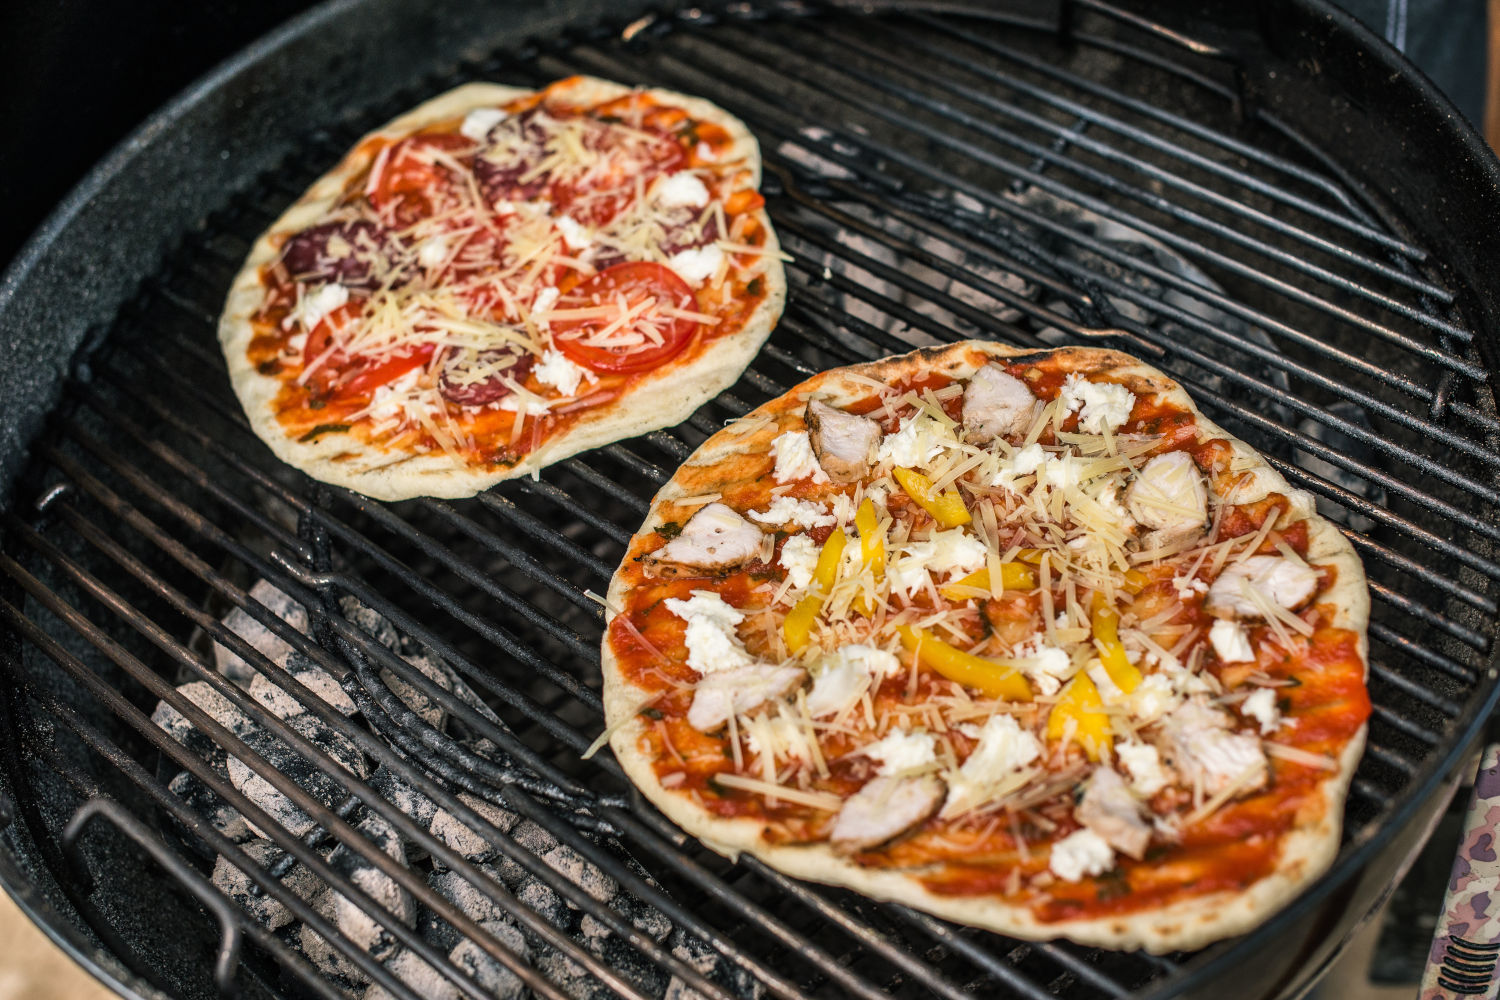
Grill the first side. Slide the dough onto the hot (direct heat) side of the grill, oiled side down. Close the lid and cook for about 2-3 minutes. You're looking for defined grill marks and a crust that has firmed up enough to flip - but not so long that it gets brittle.
Flip and top immediately. Use tongs or a pizza peel to flip the dough, then quickly transfer it to the indirect heat side of the grill. Now - working fast - brush the grilled side with a little more olive oil, spread your sauce, add cheese and toppings. Less is more here. Overloading the pizza means the toppings won't cook through before the bottom burns.
Close the lid and finish. With the pizza over indirect heat, close the lid and let it cook for another 5-7 minutes. The trapped heat creates a convection effect (basically turning your grill into an oven) that melts the cheese and finishes the toppings. Peek occasionally - every grill has hot spots, and you may want to rotate the pizza once during this stage.
Rest before cutting. Pull the pizza off the grill with a peel or a large spatula and let it rest for 2-3 minutes on a cutting board. This isn't just about not burning your mouth - the cheese needs a moment to set up so it doesn't slide off when you cut.
Temperature Guidelines for Gas Grills
For direct grilling fresh dough, aim for 425-500°F. You want it hot enough to sear the crust quickly, but going above 550°F increases the risk of burning before the toppings finish. For the indirect cooking phase, the grill should settle around 375-400°F with the lid closed.
How Do You BBQ Pizza on a Charcoal Grill?
Charcoal adds another dimension of flavor that gas just can't match, but it requires a bit more finesse since you don't have temperature dials to twist.
Setting Up the Charcoal
The two-zone concept is even more important here. Bank all your lit coals on one side of the grill - that's your direct heat zone. The other side, with no coals underneath, is your indirect zone.
A common mistake is spreading coals evenly across the whole grill. Don't do that. You need somewhere cool to park the pizza while the toppings finish, or you'll end up with a charcoal-flavored frisbee.
The Charcoal Difference
With a charcoal setup, many experienced pizza grillers actually cook the entire pizza on the indirect side from start to finish. Here's the modified approach:
Place the oiled dough on the indirect zone with the lid on for 1-2 minutes. Rotate 180 degrees, cover again, and cook another 1-2 minutes. Flip, add your toppings, return to the indirect zone, and close the lid for 5-7 minutes until the cheese melts and the bottom is golden.
The indirect-only approach gives you more control with charcoal, where temperature fluctuations are more common. The radiant heat from the coals on one side and the trapped convection heat from the lid does the work. If you find the charcoal side of the grill is running too hot and charring things before they're done, move your coals into a crescent or "C" shape around the edges, leaving the center as the indirect zone.
Using a Pizza Stone or Steel on the Grill
If you're nervous about putting raw dough directly on grill grates - or you've had bad experiences with dough falling through - a pizza stone or pizza steel is your best friend.
Place the stone or steel on the grill grates before you preheat. This is important - especially for stones. Dropping a cold stone into a screaming hot grill can crack it. Steel is more forgiving, but both need at least 15-20 minutes to fully absorb heat.
The approach works similarly to baking pizza in an oven. You build the pizza on a floured peel, slide it onto the hot surface, close the lid, and let it cook for 8-12 minutes, rotating halfway through for an even bake.
The advantage is a more evenly cooked bottom - no grill marks, but a consistent, crunchy crust all the way across. Both stone and steel absorb and redistribute heat, acting as a buffer between the flames and your dough. It's an especially good approach for thicker doughs or heavily topped pizzas that need more time.
If you're choosing between the two, steel has an edge for grilling. It conducts heat faster for a crispier bottom, and it won't crack from thermal shock the way ceramic can. The one thing to watch: turn off the burner directly beneath the steel when you cook, or the bottom will burn before the toppings finish. For a deeper dive on steels, check out my complete pizza steel guide.
How to Cook a Frozen Pizza on the Grill
Here's one that catches a lot of people off guard: grilling a frozen pizza is not only possible, it's arguably better than using your oven. The high, direct heat of a grill gives frozen pizza a crispier crust and more deeply caramelized cheese than most ovens can achieve - and you don't have to heat up your kitchen in July.
The Simple Method
Preheat the grill with the lid closed for at least 15 minutes. You want it around 375-400°F. If your grill runs hot, start on the lower end to avoid scorching the bottom before the toppings thaw and cook.
Unwrap and place directly on the grates. No pan, no stone, no foil needed. Take the frozen pizza right out of the box, remove all packaging, and place it straight onto the grill grates. Keep it frozen - don't thaw it first, or the crust will get soggy.
Close the lid and cook. This is where the grill's convection works its magic. With the lid closed, heat circulates around the frozen pizza just like an oven - but with more intensity from below. Cook for 10-15 minutes total, rotating the pizza every 5 minutes to account for hot spots.
Check for doneness. The crust should be golden to dark golden (a bit darker than oven-baked is normal and desirable), the cheese should be melted and bubbly, and if you have a food thermometer, the center should read at least 160°F.
Cool before cutting. Pull it off with a large spatula and let it sit for a few minutes. The cheese on a grilled frozen pizza is hot.
Pro Tips for Frozen Pizza on the Grill
Standard 10-inch frozen pizzas work best. Larger 16-inch pizzas can work but need lower heat and longer cook times. If you find the bottom is cooking too fast, reduce the heat or set up indirect zones like you would for fresh dough. And here's a nice upgrade: add fresh toppings like basil, arugula, or a drizzle of good olive oil after the pizza comes off the grill for a semi-homemade touch.
How to Cook Pizza on a Smoker
Pellet smokers and offset smokers have become wildly popular for backyard cooking, and yes - they make excellent pizza. The smoke adds a wood-fired flavor that's hard to beat, and pellet grills in particular offer precise temperature control that makes the process pretty forgiving.
Pellet Grill / Pellet Smoker Method
Set your pellet grill to its highest temperature - usually 450-500°F depending on the model. Place a pizza stone inside while it preheats (at least 15 minutes). Stretch your dough, build your pizza on a floured peel, and slide it onto the hot stone.
Cook for 10-15 minutes, rotating halfway through. The pizza is done when the cheese is melted and bubbly, the crust edges are golden brown, and the bottom sounds hollow when you tap it.
The cook time on a pellet smoker is a bit longer than on a gas grill because most pellet grills can't quite reach the same peak temperatures. But that extra time is actually a bonus - it means more smoke exposure and more of that wood-fired flavor in every bite.
Choosing Your Wood Pellets
The wood you burn matters for flavor. Here's a quick breakdown:
Oak is the most versatile choice and a great starting point. It delivers a medium-strength smoke that complements cheese and tomato sauce without overpowering anything. If you're new to smoked pizza, start here.
Apple and cherry produce lighter, slightly sweet smoke. They're great for pizzas with delicate toppings or fresh mozzarella.
Maple adds a subtle sweetness and works well as an all-around option.
Hickory brings a stronger, more assertive smoke flavor. It pairs well with meat-heavy pizzas (think sausage, bacon, or pepperoni) but can be too much for simpler pies.
Mesquite is the strongest option and best used sparingly. A little goes a long way - it can overwhelm lighter toppings quickly.
Since pizza cooks relatively fast (10-20 minutes), you won't absorb as much smoke flavor as you would with a brisket or pork shoulder. Because of this, many pitmasters recommend using stronger woods like hickory or oak for smoked pizza to make sure the flavor actually comes through in that short cook window.
Offset Smoker Pizza
If you're working with an offset smoker rather than a pellet grill, the process is similar - get the chamber up to 400-450°F and use a pizza stone. Offset smokers tend to produce more smoke than pellet grills, so you can get away with milder wood choices like apple or cherry and still get great results. Just keep an eye on airflow and temperature - offsets can be less consistent, so rotate your pizza and watch for hot spots.
Dough Tips for Grilled Pizza
Not all pizza dough performs equally on a grill. Here are a few things to keep in mind:
Room temperature is non-negotiable. Cold dough tears, snaps back, and doesn't stretch evenly. Pull your dough out of the fridge at least an hour before grilling - two hours is even better if you have the time.
Go thinner than you think. Thick dough on a grill is a recipe for a raw center and a burnt bottom. Aim for a crust that's no more than 1/4 inch thick in the center. The edges can be a bit thicker to hold in your toppings.
Higher protein flour helps. Bread flour or a strong "00" flour will give you a dough that stretches without tearing and holds up better on the grates. If you've been using all-purpose and finding that your dough rips or sags through the grill, it might be time to upgrade your flour.
Oil the dough, not the grates. Olive oil on the dough-side that touches the grill prevents sticking and adds flavor. Oiling the grates can cause flare-ups.
Use the PizzaLogic dough calculator to nail your recipe. Getting the right hydration level matters more on the grill than in the oven. Too wet and the dough will droop through the grates. Too dry and it won't stretch without cracking. The calculator helps you hit that sweet spot every time.
Topping Strategy for the Grill
Grilled pizza cooks fast - much faster than oven pizza. That changes how you approach toppings.
Pre-cook anything raw. Sausage, chicken, ground meat, thick-cut vegetables - all of these need to be cooked before they go on the pizza. There isn't enough time on the grill to cook raw meat or soften dense veggies.
Go easy on the sauce. A thin layer is all you need. Too much sauce and your crust gets soggy before it has a chance to crisp up.
Less cheese, more flavor. A heavy blanket of shredded mozzarella takes forever to melt on a grill and can insulate the dough from the heat. Use less than you normally would and consider fresh mozzarella torn into small pieces - it melts faster and distributes more evenly.
Add fresh toppings after. Arugula, fresh basil, a drizzle of good olive oil, balsamic glaze, fresh herbs, microgreens - add these after the pizza comes off the grill. They'll wilt and burn if they go on during cooking.
Keep moisture off the pizza. High-moisture ingredients like fresh tomato slices, wet roasted peppers, or just-drained olives should be patted dry before going on, or added after the cook. Soggy pizza is the enemy, especially on a grill where you can't easily control steam.
Common Mistakes (and How to Avoid Them)
Not preheating long enough. Give your grill a full 15-20 minutes to preheat. Putting pizza on a grill that hasn't fully come to temperature leads to uneven cooking and a pale, chewy crust instead of a crispy, charred one.
Overloading toppings. It's tempting to pile everything on, but a loaded pizza takes too long to cook through on a grill. The bottom burns while the center stays cold. Keep it simple - three to four toppings max.
Forgetting to oil the dough. Bare dough on hot grill grates will stick, tear, and ruin your evening. Oil is your insurance policy.
Cooking with the lid open. The lid traps heat and creates convection. Without it, only the bottom cooks and the top stays cold. Keep the lid closed during the indirect cooking phase.
Panicking about shape. Grilled pizza doesn't have to be a perfect circle. Ovals, rectangles, amoeba shapes - they all taste the same. Embrace the rustic look.
Quick Reference: Temperatures and Times
| Method | Target Temp | Cook Time | Notes |
|---|---|---|---|
| Gas grill, direct + indirect | 500°F (direct), 375-400°F (indirect) | 2-3 min + 5-7 min | Best all-around method |
| Charcoal grill, indirect only | 400-450°F | 10-14 min total | Rotate halfway through |
| Pizza stone/steel on grill | 450-500°F | 8-12 min | Preheat stone/steel 15-20 min |
| Frozen pizza on grill | 375-400°F | 10-15 min | Direct on grates, rotate every 5 min |
| Pellet smoker | 450-500°F | 10-15 min | Use pizza stone, stronger wood pellets |
Fire It Up
Grilling pizza is one of those things that sounds more complicated than it actually is. Once you do it a couple times, you'll wonder why you ever limited yourself to the oven. The crust is better, the char is real, and there's something about making pizza outside - beer in hand, grill fired up - that just makes it taste better.
Start with whatever setup you have. Gas grill, charcoal, pellet smoker - they all work. Dial in your dough with the PizzaLogic dough calculator, keep your toppings simple, and don't be afraid to burn a pie or two while you're learning. That's just part of the process.
Happy grilling.